guessing-game
Example Graphical Application using JavaFX
This is a simple guessing game with a form-based graphical user-interface using JavaFX. JavaFX is a set of classes and tools for creating graphical applications. JavaFX is included in the Java API and Java Development Kit.
JavaFX defines the UI as a FXML file (a kind of XML) that describes what components are in the UI and how to lay them out. You can also create or modify the JavaFX UI using Java code, which is useful in some apps.
To visually layout the UI and set properties, use a visual editor named SceneBuilder that you must install separately. SceneBuilder integrates with most IDE (Eclipse, Netbeans, IntelliJ). When you use SceneBuilder to design a UI, SceneBuilder saves the layout as an FXML file. The FXML file also has a reference to a Controller class that handles events from UI components. Putting the UI definition in an FXML file (instead of Java code) is similar to the way Android and .Net applications define user interfaces.
Overview of GUI App Design
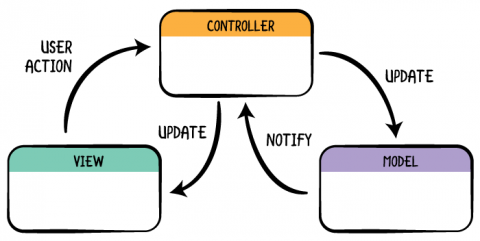
Applications with a graphical user interface (GUI) divide the code into components, based on functionality:
- User Interface or View contains visual components, layout, and formatting of the UI.
- Controller handles events from the View, updates the View, and acts as a bridge between the View and the Model.
- Model contains the logic and code for the application. It usually has no knowledge of the View and Controller, but responds to requests (method calls) from them. The Model typically consists of many classes and may itself be divided into components or layers.
And one other class:
- Application class or Main class that starts the application. It creates initial objects for model, view, and controller, connects them as needed, and starts the UI. Its usually very short.
Example Game Using JavaFX
This project contains a sample game that you can customize or extend. The code is general enough that you can modify it to play other games without modifying the UI (View) much.
- GameUI.fxml - user interface using JavaFX (written in SceneBuilder)
- GameController.java - controller handles events from UI and updates the UI
- GameModel.java - a guessing game. Has methods for communicating with the controller.
- GameApp.java - “main” class that configures the application and launches the UI.
Each component is explained below.
GameUI.fxml - user interface in JavaFX
The simple user interface contains these components:
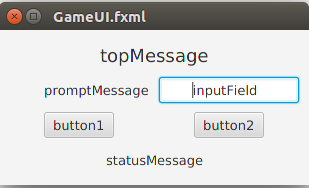
The figure shows the name of each component, which is its “fx:id” used by JavaFX. You can view or modify this UI using SceneBuilder.
The components are Labels, Buttons, and one TextField arranged using a GridLayout. Each component has a few properties set, such as its “fx:id” and text alignment.
To edit this file in Eclipse, right click on the file and choose “Open with SceneBuilder”. You can also open the FXML file in a plain text editor and see what it looks like.
GameController.java
The controller handles events generated from the View (UI) and updates the UI. In the example code, it also initializes the text shown in the UI.
Here is part of the code for the controller:
public class GameController {
	@FXML
	Label topMessage;     // message displayed at top of window
	@FXML
	Label promptMessage;  // prompt before the input field
	@FXML
	Label statusMessage;  // for errors, results. Shown at bottom.
	@FXML
	TextField inputField; // user input field
	@FXML
	Button button1;       // usually the submit button
	@FXML
	Button button2;       // clear, quit, or cancel button
	/** Reference to the game we are playing. */
	private GameModel game;

	@FXML
	public void initialize() {
		// initialize controller and set text shown in the UI
	}

	public void button1Press(ActionEvent evt) {
		// do something when button1 is pressed
	}
The attributes annotated with \@FXML are used to connect UI components in the FXML file to object references in the controller.
JavaFX will create the UI components and set each attribute with a @FXML tag to reference the UI component with the same fx:id. This is how you connect your visual components to Java code. Its up to you to assign ids to UI components (using SceneBuilder) and make sure they exactly match the names in the controller class.
Hint: When coding, define variables for the UI components in the controller first, annotated with @FXML. Then when you edit the UI in SceneBuilder and specify the name of your controller class, SceneBuilder will populate the drop-down fx:id boxes with the names it read from the controller. This avoids typing errors.
The initialize() method initializes the UI. In the guessing game code, we set the text on labels:
@FXML
public void initialize() {
    promptMessage.setText("Your guess?");
    button1.setText("Submit");
    // display a message from the model (game)
    statusMessage.setText( game.getMessage() );
    ...
}
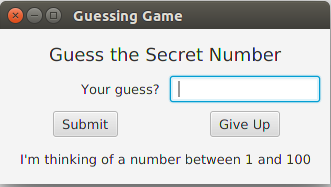
JavaFX automatically calls initialize() when it creates the controller and UI. After that, the UI will look like this:
Note: The initialize() method must be annotated with \@FXML in order for JavaFX to automatically invoke it.
Handling Events from the View (UI)
The UI generates events when the user does something. Clicking a button, pressing Enter, or moving the mouse all generate events.
What to do with those events? Your application has to provides event handlers (methods) for UI events your app is interested in. Using SceneBuilder, you can specify what events should be handled by what methods in the controller.
In the example code, the controller has methods button1Press and button2Press (you can use any names). In the GameUI form, it specifies that the “On Action” handler for button1 is button1Press and for button2 it is button2Press. Open the GameUI form using SceneBuilder, select button1, and open the “Code” toolbox; you will see that the “On Action” event handler for button1 is the button1Press method (it also shows what other events are available). The result is:
| Component | Event | Event Handler in the Controller |
|---|---|---|
| button1 | On Action | button1Press(ActionEvent evt) |
| button2 | On Action | button2Press(ActionEvent evt) |
Event handler methods should be public void and may either have no parameter, or a parameter for the event type. For Action Events, the parameter type is ActionEvent. In GameController, the method is:
/** Handle button1 press. */
public void button1Press(ActionEvent event) {
    // Get the user's input and process it.
    String input = inputField.getText().trim();
    if (input.isEmpty()) {
        statusMessage.setText("Please input a guess.");
        return;
    }
    statusMessage.setText(""); // clear old message
    boolean ok = game.guess(input);
    if (ok) {
        // user guessed the secret value
        topMessage.setText("Right!");
    }
    else {
        // get a hint from the game and show it to user
        String message = game.getMessage();
        topMessage.setText( message );
    }
    ...
}
When the user clicks on button1, JavaFX calls our button1Press() method. button1Press reads the user’s input and calls the game to evaluate the user’s input. Then it updates the UI to show the result.
Initializing Fields in the UI
The controller class (GameController) has a method named initialize() annotated with @FXML. JavaFX calls this method after it creates the UI components. To make the UI easy to modify, I use the initialize() method to set the text shown on the UI buttons and labels. initialize() also gets an initial message (hint) from the game and displays it in a label field.
You can hard-code the text strings into the fxml form, instead of using Java code, but its less flexible.
You can also assign event handlers in initialize() instead of specifying them in the UI (FXML file). See the section below “Assigning Event Handlers Programmatically” for how to.
GameModel - the Model class
The Model class contains the logic for the application. In the guessing game, the model is responsible for:
- randomly choose a secret number (1 to an upperBound)
- evaluate the user’s guess and return true (correct) or false (incorrect)
- give hints and messages - the getMessage method
Your application logic should be in the Model, not in the Controller.
The only logic that belongs in the controller is:
- checking for valid input
- the flow of the application, such as starting a new game or displaying a new form, enabling/disabling controls based on context
Main class - initialize and start the app
The GameApp class is a “Main” class that creates initial objects and starts the application. For GUI apps, “start the application” means to display the UI.
In JavaFX, the FXMLLoader class creates the controller itself based on info in the UI’s fxml file. So, the main class just initializes the JavaFX objects (using FXMLLoader) and tells it what fxml file to display.
In good design, the Main class would also create the Model class instance and inject it into the controller. But in JavaFX this requires more code. For simplicity, we let the GameController create the model (game) itself – even though its not a great design.
The Main class in JavaFX extends Application and overrides a callback method named start(Stage). When the main method calls launch (a method in the superclass), it initializes JavaFX and calls back to your start method.
The GameApp class uses a typical code template, but there are other ways of starting JavaFX.
public class GameApp extends Application {
    public static final String START_SCENE = "game/GameUI.fxml";

    /**
     * This is a call-back method to display initial window using JavaFX.
     * @param stage the primary "stage" for showing the scene.
     */
    @Override
    public void start(Stage stage) {
        Parent parent = null;
        try {
            URL form = this.getClass().getClassLoader().getResource(START_SCENE);
            parent = FXMLLoader.load(form);

        } catch (Exception ex) {
            Logger.getLogger("GameApp").log(Level.SEVERE, "Failed to load form", ex);
            return;
        }

        Scene scene = new Scene(parent);
        stage.setTitle("Guessing Game");
        stage.setScene(scene);
        stage.show();
    }

    public static void main(String[] args) {
        launch(args);
    }
There is another way to access the FXMLLoader, which is useful if you want to access the Controller of your scene.
    FXMLLoader loader = new FXMLLoader();
    parent = loader.load(form.openStream());
Assigning Event Handlers Programmatically (using Java Code)
You can add event handlers to UI components using Java code, instead of setting them in the FXML form. This localizes the event handler logic in the controller class (instead of coupling between controller and the fxml form), and enables refactoring.
Each UI component has methods for adding event handlers. To specify an event handler for button1 for the “ActionEvent” type, use the setOnAction method. In GameController you can write:
// Set the handler for On Action events (clicking the button).
// Syntax:   button.setOnAction( EventHandler<Action> handler )
button1.setOnAction( this::button1Press );
The parameter this::button1Press is a method reference – it refers to the button1Press method of this object.
The Javadoc for Button.setOnAction() tells us that setOnAction expects an EventHandler (interface) that has a single method with a parameter of type ActionEvent and returns void. So, our method reference (this::button1Press) should be a method with a parameter of type ActionEvent and returns void (code for button1Press shown above).
Each UI component has many events you can choose to “handle”. Most of them have names beginning with setOn, such as setOnAction() or setOnKeyTyped().
You can use the same method to handle events from many components. In most applications, pressing ENTER is the same as clicking the “Submit” button. In our GuessingGame, we can use the same code to handle events from both the InputField and the button1 Button. For example:
// When user presses Enter in the inputField, its same as clicking button1:
inputField.setOnAction( this::button1Press );
If your code needs to know which button or component caused the event, in your event handler code call event.getSource() to get the component that caused the event.
Exercises
You can extend this game or use the classes to create your own game. Try this:
- button2 doesn’t do anything. Write code in GameController to handle button2 press and show the secret number.
- Add code to GameController to start a new game when the user guesses the secret. Consider two ways to implement this:
- show a pop-up dialog box asking if he wants to play a new game.
- display a question in the game form, and change the labels on button1 and/or button2 for the user’s choices (play new game or quit).
- Add an “On Action” event handler to the InputField in the UI. This way, the user can type his answer and press ENTER instead of clicking the “Submit” button.
- You can do this either in the FXML form or using code in the
initialize()method.
- You can do this either in the FXML form or using code in the
- Use the example code to write a Quiz Game. In a Quiz, the GameModel class provides the quiz questions and answers.
- Add a scoreboard to the game.
Getting SceneBuilder
SceneBuilder is a graphical tool for creating JavaFX interfaces. The current version of SceneBuilder is distributed by Gluon, and is the suggested version. On GluonHQ you can download SceneBuilder as single JAR or as a package for your OS. Either one will work with Eclipse.
- SceneBuilder 8.x from Gluon the current version. There are 2 distributions:
- SceneBuilder Executable Jar - single JAR contains only SceneBuilder and runs directly on your JRE.
- SceneBuilder Native App - for Windows, Mac OSX, Linux, includes SceneBuilder, launcher, and JRE. The JRE is unnecessary extra space, since you already have a JRE (part of the JDK).
- Old SceneBuilder 2.0 from Oracle the last version from Oracle.
I am using SceneBuilder 8.4 from Gluon. It is almost identical to SceneBuilder 2.0 and integrates well with Eclipse and Netbeans (haven’t tried IntelliJ).
Configure SceneBuilder in your IDE
You need to tell the IDE where the SceneBuilder JAR or executable is located.
Eclipse: From the Window menu, choose Preferences. Select JavaFX. In the text box, input the path to the SceneBuilder executable.
NetBeans: From the Tools menu, choose Options. Select the “Java” category and click the “JavaFX” tab. In the “SceneBuilder Home” input field, enter the directory on your system that contains SceneBuilder.
NullPointerException: Location Must Be Specified
When running JavaFX projects from a command line or JAR file, a common problem is a NullPointerException wth message “Location Must Be Specified”. This may be caused by fxml files not being present in the “build” directory or JAR file.
Check that your fxml files have all been copied to the “build” directory and included in the JAR file. You can view contents of a JAR file using any ZIP viewer such as WinZip, or jar -t jarfile.jar.
The IDE should copy your .fxml files from the src/ directory to the build directory, but sometimes it does not. When you create a JAR file, verify in the dialogs that the IDE includes .fxml files in the JAR, too.